Sunday, November 17, 2013

Free Museum Tickets


This post is more for local followers, but it wouldn't hurt to check out your area too. 


Sacramento Public Library has started a new program called Discover & Go. The program gives library card holders access to free museum passes to some pretty good museums. You simply need a library card, a PIN that goes with that card, and then choose a date for your adventure. Since this program is free and public, it is best to reserve your tickets ahead of time. Each card member may reserve 2 requests at a time. Once you have used one of your tickets, then you may request another one. Each museum has different passes available, so check out the website to find more information. For example, the Exploratorium allows only one free ticket and it is limited to one per year. The Aquarium of the Bay also only allows one pass per year, but their pass is a family pass with 2 free adults (ages 13 and up) and 2 children (ages 4-13). So, check out the website to reserve your tickets.

Some of the museum tickets available include:
Aquarium of the Bay
Bay Area Discovery Museum
Exploratorium
Golden State Model Railroad Museum
SS Red Oak Victory
UC Botanical Garden at Berkeley
USS Hornet Museum
And so many more!

If you are having trouble with the links, here is the direct link to the Discover and Go Program: http://www.saclibrary.org/Services/Museum-Passes/

~Possum

Wednesday, November 13, 2013

Homemade Christmas Gifts

Christmas is coming! That means gifts, decorations, family, and craziness. I decided to share some homemade Christmas gift ideas that might be more affordable this Christmas. Homemade gifts are not about the money, but the heart behind them. When it comes to gift giving, I try to put myself in the other person's shoes to decide what they would really like.

For example, I have a family member who has a large paycheck and doesn't really need anything nor want anything. They are the type who finds something they like and just buy it. Gift giving for them is always a challenge. What do you get them? I try and think of things that they really like, but require some effort and time to make. For my family member, they work long hours and odd schedules. So, I am making small size freezer meals that can be warmed up at any time for a delicious meal. It is like fast food without the nasty fried fattiness. That is something they will enjoy and be useful too.

So, here is the first of -hopefully- many posts about homemade Christmas gifts for your loved ones. Share a piece of yourself instead of your wallet. 

Recycled Cookie Jars

Items needed:
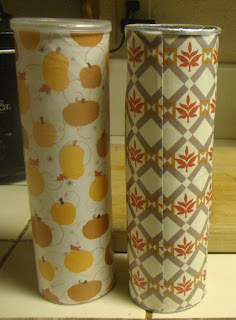
Pringles Can (with lid)
Glue - I used Mod Podge
Decorative paper - 9 inch X 9 inch
Cookies
optional: other decorating items like a bow, ribbon, etc.

Take an ordinary Pringles can. I used the BBQ kind because my kids are obsessed with this flavor. I used the tall version, but I bet the snack size jars would work too.

I measured a piece of scrapbook paper, but wrapping paper or any kind of pretty paper would work. You need a piece of paper 9 inch by 9 inch.

I started putting glue on one strip of the paper to stick it to the Pringles can. Gluing additional strips along the paper, I glued the whole paper onto the can. For good measure, I covered the whole can in a layer of Mod Podge. You don't have to do this, but just make sure your paper is sufficiently stuck to the can.

Let your glue dry while you make cookies of your choice. I made chocolate chip cookies and used a small ice cream scoop for mini cookies. These ended up being the perfect size for the Pringles can.
Yummy cookies in the can.

You can stick a bow on the top, maybe tie a ribbon around the whole can to keep the lid on, or whatever your decorating needs require. Attach a tag with a note and you have a whole cute gift. If you make a good size batch of cookies, you can make several of these at once.

I bet some of you are thinking- what am I going to do with all those chips? Share them too! Maybe make a chip plate for family get-togethers, or start early and eat them yourself... Whatever your heart desires.

Happy Holidays!
Possum

Tuesday, November 5, 2013

What's for dinner?

Green Bean Casserole
Do you need a quick and delicious meal?
Just follow the directions for this delicious casserole.


Ingredients
1 cup sour cream
1 can cream of mushroom soup
1 can (14.5 oz) green beans
1 cup shredded cheese (I use cheddar or mozzarella)
1 cup left over chicken or turkey - chopped into pieces
1 box Stove Top Chicken or Turkey stuffing
1 1/2 cup water (for Stuffing)
1/4 cup butter or margarine (for Stuffing)

Preheat oven to 350 degrees.
Make Stove Top Stuffing.
If you have left over stuffing already made,
you can skip making this and just use your left overs.
You can follow the directions on the back of the box.
Let the Stuffing sit off the hot burner once you are done making it.
Take a large bowl and put sour cream and cream of
mushroom soup into it. Mix that together.
 Drain the water from the green beans and pour the beans into the big bowl.
Add the shredded cheese and the chicken.
 Mix everything together.
 Pour the mixture into a pan. I used a 9 x 9 pan, but that makes it a very thick casserole.
I usually use a 13 x 9 pan and that spreads the casserole out. Either works just fine.
 Pour the pre-made stuffing on top of the mixture.
Spread it around until the entire casserole is covered.
 Put your casserole directly into the oven. You can put it on the
middle shelf or the top shelf (like in my photo). Bake 35 minutes.
Once done, let it sit on the counter for 5 minutes and then enjoy!
Warning: the casserole is very hot at first and you will have
to resist the urge to eat all of it. Let it cool off first :-)

Dinner's ready!

Sunday, November 3, 2013

Homemade Sensory/Light Table

Let me introduce this by saying that I have the best husband in the world. Sorry girls, he is all mine! Just look at the awesome table my husband built from PVC pipe. I found the idea for this from Busy Bugs blog. We modified the build because we couldn't find a 3 way joint that the Busy Bugs blog used.

Here are the materials we used. We went shopping at the Home Depot and found everything there for $30. How awesome is that? Sorry for the less than technical drawing of the parts. I forgot to take a picture of the parts before he started building.

Here is a more technical list of the parts you will need if you want to replicate this.
Plastic Sterilite container:
2 PVC pipe: we used 3/4 inch and bought 2 of the 10 foot pipes
PVC pipe 90 degree elbow
PVC pipe 3 way joint
1 PVC glue (that is the blue stuff in the picture)
1 PVC pipe cutter

We made the base of the table around the container we found. If you buy a different size, adjust your table size accordingly. We decided to glue the top parts and the bottom parts together. So, the "legs" are not glued and can be taken out. This allows the table to be broken down and lay flat. I told you my husband was awesome!
I didn't measure everything and will let you figure that part out. My husband eyeballed everything around the box we bought and kept moving things until they fit like he wanted. I admit that we actually bought 3 lengths of PVC pipe because we were afraid that we would need some "oops" pipe. We didn't end up using the third pipe, but it was nice to have the backup. And it was still $30 for all of it - including the cool pipe cutter.
Here is the best part of all: I saw another plastic container that is slightly smaller than the one in our sensory table, but has a frosted clear lid. I intend to buy some small LED flashlights to place in the smaller container and put the lid on. This makes a great light table. I can then put the whole container directly into my bigger sensory table container and have a homemade light table. How cool is that?  I will take pictures when we get around to doing that.

Right now, the kids think the sensory table is downright fantastic. I put colored warm water with fun toys in the table. The kids played in it for over an hour. The only reason they stopped was that it was really cold and they were all wet. I foresee many afternoons of play time with this table. Good thing it is sturdy.

**Update: We have had this for over a year now and it is still going strong. We use it almost daily and it is showing very little wear. The only thing that is wearing is the lid on the container. I can replace that easily. The actual stand looks like the day we built it.

Homemade Rolls Part 2

How are your rolls doing so far?
If you missed the first installment : go Here
and it will guide you through how to make the dough for your rolls.
This is how we left our rolls in our last installment.
The dough should have risen quite a bit. If your dough looks smaller, then maybe let it sit for a little longer. Your dough can definitely get bigger than this, but not over the sides of the bowl. If you let dough rise too much, it will fall and your rolls will be flat, dense and chewy.
TIP: Remove all your jewelry on your hands before you get them covered with flour and sticky dough.
 Time to roll out your rolls. Make sure to set aside a big area for your adventure. I use my wooden cutting board. Your area should be flat. A tiled area with lines is a bad idea. Cover your area with flour. I simply dump a pile of flour and spread it around with my hands.
I roll my rolling pin in the flour and make sure it is coated with flour too.
Dump part of your dough -- I said PART. That means you can dump maybe a quarter of your dough or a half. Not the whole thing! Trying to deal with the whole batch of dough all at once is really tricky and should be attempted after you have made rolls a few times. Once you have gotten skilled at rolling out your dough, dealing with a larger batch gets easier.
Sprinkle flour on top of your dough. You are trying to coat the entire glob of dough with flour. You can roll your dough around in the flour until it is not as sticky.
Use your floured rolling pin and begin rolling your dough flat. You want your dough to be about 1/4 inch or the thickness of a pencil. It is acceptable to make your dough even a little thicker.
This is the fun part. You get to cut out your rolls. I use a round glass to make circles. You can also use a pizza cutter to make squares, or whatever shape you want. Please note that this will not be the final shape of the rolls. That cute little hand in the photo above is my big boy helping cut out circles. Even kids can do this.
Once you have cut out a circle, you are going to take it in your hands and stretch it slightly. See above. 
Fold the stretched roll in half to create a half circle looking roll. By doubling the roll, you are adding the pocket that will be where you add your butter, honey, jam, or whatever goodness you want later. This also makes your roll thicker and you want that thickness for a good tasting roll. 
Continue cutting out your rolls and add them to a non-greased cookie sheet. After you have cut out all your circles, put all the unwanted weird shaped pieces in a corner of the cookie sheet.
This is my pile of left over pieces. Once you have finished with that piece of dough. Cover your board with flour again and continue with another batch of dough. Repeat until all your dough is on the cookie sheet. One full batch of this recipe should completely fill one cookie sheet.
It is okay if there is some space between the rolls. The rolls need to rise one more time.
Cover your rolls with a clean towel and let them rise. This should take about 40 minutes to 90 minutes.
This is what your rolls should look like after they have risen.
This is a close up of my odd pieces in the corner.

Preheat your oven to 400 degrees F. Don't turn your oven on and put your rolls in. This will cook only one side of your rolls and they will taste funny. Give your oven time to heat up. Your rolls can rise for a few more minutes. Make sure your oven rack is either on the top or middle setting. Don't cook your rolls on the bottom rack.
Bake your rolls for 10 minutes and check them. You know how your oven cooks, some hotter or cooler than others. Adjust your time accordingly.
The tops of your rolls should be a  light golden brown color. You don't want
them to get any darker than above or your rolls will be a little crunchy. 
This step is optional. I take a cold stick of margarine, tear off the top of the stick and gently rub the rolls with the margarine. This gives the rolls the nice sheen you see in the picture. It also gives the rolls a lovely taste, but adds tones of calories to each bite. My kids eat the rolls just like this. If you plan on putting butter in the roll anyway, you probably could skip this step.

Now, what are you going to do with all these rolls? Serve them for dinner,
eat them yourself, or share them with a friend? Yum!

Saturday, November 2, 2013

Homemade Rolls Part 1

I love homemade fresh yeast rolls. There is nothing better than having your whole house smell like fresh baked bread. I decided to make a tutorial for making my mother's recipe for white rolls. Making rolls is the kind of recipe that you need to have a tutorial the first time. Following the recipe is bound to get you "lead-bread" as I found out my first time attempting it. So, here is half of the recipe. The next post will contain the rest.
Gather your ingredients.
Ingredient List
2 cups milk: whole milk is the best
   Any other "octane" of milk will work.
   I have even used dried milk with water and it turned out great
5 1/2 cups white flour (you can replace with whole wheat, but I haven't tested this. Try at your own risk)
2 Tbs dry fast rising yeast OR 2 packages (1/4 oz) dry fast rising yeast
3 Tbs Margarine or butter
3 Tbs Vegetable oil (can replace with canola oil or coconut oil)
2 large eggs
3 Tbs white sugar + 1/2 tsp for proofing yeast
1 Tbs salt
1/4 cup lukewarm water

Choose a large bowl and put the white sugar, salt, vegetable oil, and margarine into the bowl.
In a small bowl, crack both eggs and stir gently a few times with a fork. See below. 
Leave eggs in bowl to rest until you need them.
Choose a small pan and measure 2 cups of milk into the pan.
DO NOT TURN ON HEAT YET!
Using the same cup you used to measure your milk, rinse it out and wait for your water to get warm. The water should be lukewarm (75-80 degrees). Put 1/4 cup of water in your cup. Add 1/2 tsp white sugar to the water.
Add your yeast to the water.
This is called proofing your yeast. This is a test to see if your yeast will rise before you place it in the bread. There is nothing worse than forgetting to proof your yeast and finding out after you made the rolls that the yeast is bad. Bad yeast + recipe = Flat nasty rolls. So, proof your yeast first!
Let the yeast sit on the counter while you do other stuff. We will come back to it.
Now you can turn the heat on for your milk! Medium to Medium-High heat.
We are going to scald milk. Make sure you have something to stir the milk. This is the fun part of watching milk heat up. It is like watching grass grow.
Stir your milk occasionally-not lots. You don't want your milk to boil, but almost. You want to warm your milk up to the point it has bubbles forming along the edges of the pan (see picture above).
You are heating the milk to 180 degrees F. Please note- if you live at high altitudes, the visual clues I'm giving you will not happen. So, use your temperature to help you do it.
The milk will stick to the sides of the pan. This is another visual clue that you did it right and not something to worry about. Your milk is not going bad.
Pour your scalded milk into your big bowl with the sugar, salt, oil, and margarine.
Stir with spoon gently until margarine is all melted and dry ingredients are incorporated.

Check your yeast. If your yeast is good, then it will have risen slightly or a lot. If nothing happened. Dump out your yeast/water mixture and repeat the proofing yeast step. You need yeast that reacts or your bread will not rise. This step should take a few minutes-- your milk mixture needs some time to cool down. So, take a minute to get a drink.
Pour in your yeast into the big bowl. You can scrap out the sides with a spatula.
Mix in the yeast with a whisk. Trust me. You need a whisk for this. If you do not own a whisk, use a fork to mix your yeast. You need to make sure the yeast is all mixed in.

Side note: You should invest in a good whisk because it is a very versatile tool and can be purchased for less than $2. I have even found them at the Dollar Store. My sister gave me a whisk when I was in college because she thought it was a sin that I didn't own one. I understand now.

 Mix in your eggs. Scrap the sides of your small bowl (green bowl in picture)
with a spatula. Mix in with your whisk.
Add 2 cups of white flour to your bowl and mix in with the whisk. Only 2 cups!
After you have mixed in the first 2 cups of flour with the whisk, you need to change to a spoon. The whisk will not help you after this. 
Mix the rest of your flour in, 1 cup at a time, until the mixture is getting sticky and hard to stir. If you don't need the whole amount of flour to get your dough to this point, that is fine! It is better to not over flour your rolls because we will add more flour during the rolling out phase. 
 Cover your bowl with a CLEAN towel or clear wrap. Let your dough sit somewhere with not too much breeze until the dough has doubled in size. This may take anywhere from 40 minutes to 2 hours.
The next post will take you through what happens after the dough rises.
~Possum