Showing posts with label homeschool. Show all posts

Wednesday, March 1, 2017

Layers of the Earth Unit study

Please keep in mind this unit is made for my autistic 2nd grader 
(some material is more 1st grade/Kinder level).

 We read The Magic School Bus: Inside the Earth book together.
This book would be a great way to learn about the different kind of rocks too. Maybe our next unit?
Another great book is Planet Earth/Inside Out by Gail Gibbons.
 I found a free coloring page: The Layers of the Earth from My Mommy Style blog. 
 I printed and put on construction paper some 3 part cards of the different layers of the Earth. I used THIS set of free cards. I found another set of free cards HERE if you are interested.
We built models of the earth using Play Doh. I bought the medium containers of Play Doh at Walmart for $0.50 each. I spent $2.50 to get the 5 colors I needed. I used: 
Red: Inner Core
Orange: Outer Core
Yellow: Mantle
Blue: Crust + water
Green: land

You could easily make your own Jello Play Doh with THIS RECIPE. That would make the Play Doh smell like different flavors to further add a sensory experience to this. I was feeling lazy.

We built rather small models of the earth because it was difficult for my daughter to control the Play Doh in bigger sections. You could easily build larger models if your child is more skilled with Play Doh.

I printed these Toothpick Flags to label the sections of our Play Doh earth. I found a blank template using Google--Sorry whoever made this. I can't find the original link. I added the labels and left some blank for older kids who want to write it themselves. Click on the image above and print if you like.

If you are looking for additional ideas:  
National Geographic has a wonderful page with information for kids.
My Mommy Style made chocolate treats to show the layers.
Another idea would be to make Rice Krispie treats of various colors and build the earth model.
Maybe a fruit plate with various fruits in circles to represent the layers?

I hope this inspires someone else to have fun with science.
~Possum 

Tuesday, July 15, 2014

DIY Practice Keyboards


After I saw this blog post by Color in My Piano, I really wanted a practice piano. I liked hers, but I wanted something a little bigger that could be used for overall piano practice.

I was initially scared of the idea and kept putting it off. Now I wish had done it sooner. It is surprisingly simple.

Materials needed:

1. Board of some shape (I bought a 0.5 inch thick board measuring 5.5 inches by 24 inches at Home Depot)
2. White paint and paint brush (or you can buy a pre-painted board for a little more money)
3. 1 Paper-size Black foam (I bought the kind that has a sticky back that you peel off --so worth it!)
4. Scissors
5. Black permanent marker (fine tip)
6. Ruler and pencil for measuring

I didn't keep track of exactly how much this cost, but I will give you an estimate. I already had scissors, ruler, pencil, and black marker, so those were free. The boards I bought were pre-cut and sanded, which means a little more money, but about $6 each. I bought a sample of white paint, about $3. Paintbrush was somewhere around $0.50. Black foam was about $2.


So here is the breakdown of cost:
-- please remember these are estimates --
2 Boards: $6 each ($12)
Paint $2
Paintbrush $0.50
Foam $2
TOTAL: $16.50 ($8.25 each)

As always, the more you make, the cheaper it is.

Also, if you just buy a board and cut it into pieces, it would cost about $4 each for 3 or 4 of these.
Another option is to go to craft store and buy pre-cut slats. They come in packages of 6-ish for around $3. They are quite a bit smaller, but much more affordable. I have even seen BBQ slats at the Dollar Store that could be used. The possibilities are endless with this initial idea.


 So here is the instructions on how to make these:
1. Take board of your choice and paint it white. If you bought a pre-painted board, skip this step.
This step takes the longest and you have to allow it to dry overnight. Looking back, I really should have used spray paint. That would have been sooooo much easier.

2. Once board is white and dry, draw your lines 7/8 inch apart. I did this step with a ruler and a pencil first, then traced with a black permanent marker next.

2.5 (Optional step): You can paint a layer of gloss over your keyboard to seal in the colors, but it is not necessary. Be warned: if your kids decide to draw on these with permanent markers--it will not come off-whether you glossed it or not.


3. Cut out your foam pieces. These should be 0.5 inch wide by 3.5 inch long. If you are using a shorter board (as in from top to bottom, not how wide), simply make your black keys shorter (smaller than 3.5 inch).

4. I found the middle key on my keyboard and decided that was middle C. I did not write C on my piano, it is just on the picture above for your benefit. I then placed the black foam accordingly around that spot. I did it first without sticking anything, then slowly attached each black key.

5. Find some resources of things to do with your fancy new keyboard:
 Come back another day and I will make a post about things that can be done with a practice piano.

For a time frame:
Painting: 20 minutes (but overnight to dry)
Draw on lines: 20 minutes
Cut out foam: 20 minutes
Attach foam: 15 minutes
TOTAL: 1 hour 15 minutes
~Possum

Sunday, May 4, 2014

Science Experiment for kids

What do you do when you need an activity indoors that will keep your kids occupied for more than 10 minutes? Enter the science experiment.


All you need to make this happen is baking soda, vinegar, food coloring (optional), pipette droppers, and a big pan.

I simply dumped some baking soda inside a 9 x 13 clear pan and shook it around to get an even layer. I used the kids' three-compartment plates and filled them with white vinegar. I dropped some food coloring into each compartment for added fun.


I gave each kid their own pan, plate (with vinegar), and a pipette. I found the pipettes at Walmart for $1.49 for a two pack. They were near the pharmacy.


Simply drop some vinegar into your pan of baking soda and watch as your colors fizz and turn into crazy creations.

This would be lots of fun on a rainy afternoon or a hot summer day when it is too hot outside. OR you can do this just because it is lots of fun. This is something we will definitely be repeating.
~Possum

Tuesday, March 4, 2014

English Essay Lapbook

 I did a favor for a friend and made her a lapbook for
language arts (English). This is more for the high school,
possibly college level writer. Even I learned a thing
 or two making this. I love it when that happens.
 Here is the inside.
I have a more detailed list of what each mini book is below.
 Another view of the inside. 
So, here is the breakdown of the lapbook:

1. 4 Types of Essays: Narrative, descriptive, expository, and persuasive. Each tab had a little explanation about that type of essay.


2.  Run-on Sentence cards: I made cards with run-on sentences and stuck them back to back and laminated them. They can be corrected using a white board marker many times for practice. I also made "correcting cards" to help understand how to correct a run-on sentence.


3-5: I made an outline for a 5 paragraph essay with
specifics on how to break it down into manageable pieces.

3. Introduction paragraph: This is broken down into three parts: Hook, Body, and Thesis Sentence.

Hook: Something catchy that makes your audience
pay attention to your topic. This is usually just one sentence.

Body: Review the main reasons why your topic is important and
which will be reviewed in the body of the paper. You can also
give necessary background. This is usually 2-4 sentences.

Thesis Sentence: the controlling statement that serves as
the backbone of the paper. Try to make this just one sentence

4. Body (3 paragraphs): This section is to help move the essay along and give more information. Each paragraph should be written using the S. E. E. method.

Statement: A topic sentence states a paragraph’s main
idea. When answering a question or responding to a prompt,
make your answer or response part of your statement.

Examples: Also known as supporting sentences, strongly
support the topic sentence and form the support every
paragraph needs to have. Whenever possible, directly cite a
published source to provide the necessary examples to support
your paragraph’s topic sentence or statement.

Explanation: Closing sentences which bring your paragraph
to a logical conclusion by clearly explaining how the cited
examples strongly support and prove the topic sentence.

5. Conclusion: This is broken up into three sections: Restate thesis, summation, and concluding sentence.

Restate thesis: Restate your original thesis to remind
the reader of where you started and the point of this essay.

Summation: Tell the reader what they should have
learned in this essay, why it is significant, and how
it relates to the real world.

Concluding sentence: The is the final thought. This is
a chance to leave the reader with something to think about.

Close-up of the middle blue match-books.

6. You may be noticing that the center of the lapbook looks like I just duplicated everything. You would be kind-of right. The left side has the explanations and the right side has empty lines with one word or letter to help prompt the writer. This is meant to be a worksheet to help write one essay.

7. 4 Kinds of Sentences: Statement, questions, command, exclamation. After reading online, these names are the easy version with the real names being fancy words that I will never repeat. So, I stuck with things I would understand and called them the easy names.

Statement: A Statement sentences tells about something.
It ends with a period.
Example: She ate pizza for lunch.

Question: A questions asks something.
It ends with a question mark.
Example: How are you?

Command: A command tells someone to do something.
It ends with a period.
Example: Eat all your vegetables.

Exclamation: An exclamation shows strong feeling.
It ends with an exclamation point.
Example: I just won 100 dollars!


8. A fun pencil-shaped book for punctuation. Don't be fooled into thinking this book will teach you about punctuation, but rather it is a fun add-in. It has examples of sentences that have different punctuation that change the meaning. Please see the example above. Punctuation can save lives! he he

So that is my attempt at teaching language arts. Hopefully, by the time my kids get that age, I will get better at this.
~Possum

Thursday, February 20, 2014

Sight word practice

I made a sight word game with sight words I found at the Dollar Store. I taped the words in a path around the room.

We read through them many times before we started playing the game. The point is to get to read the words well and fast enough that they are memorized. We started at the starting point and walked the "path" until the end.

 I tried to make the first words make a sentence, but after that it just sounds like babble.
I made the last word be "Stop." 


Here's our rules:
If you miss a word, you start over.
You have 1 minute to read them all

We are still working on it.
~Possum

**Update: This activity is a great way to practice sight words, but didn't work for us. After two days on the floor, half the words were eaten or chewed by little brother. He dominates the floor right now and eats everything he can get into his mouth. We ended up pulling all the words up. I need another way to do this instead. Any ideas?

Tuesday, February 18, 2014

Butterfly Garden: Live caterpillars that change into butterflies

After we received the box, we ordered the live caterpillars.
I thought I would share our experience with pictures.

 These are the caterpillars on arrival and the day
before they started making chrysalises.

Take a note if you do this, read the instructions and
don't put the caterpillars in direct sunlight. They die.
We received 5 caterpillars and only had 4 survive.
Don't tell my kids.

 The caterpillars didn't form their chrysalises all on one day.
It took about 3 days for all of them to make their chrysalises.

According to the order they formed their chrysalises,
they all hatched. It took about 3 days for them all to hatch. 
We got extremely lucky in that we caught a butterfly just
as it was coming out. My son sat and watched the miracle of this
tiny bug crawl out all slimy and spread out its wings.

One of the last butterflies to hatch didn't get its wings out
all the way before it dried. So, it had a deformed wing
that was curled outward. We were worried about it,
but it flew just fine and took off when we let them go.

I admit that it is pretty cool to watch.

About 2 days after all the butterflies hatched,
we set them free in a good grassy, flowery place. 
My son tried to chase them. They are too fast.
Definitely a great thing to do with your kids. 
I recommend this as a fun summer activity.
~Possum

Saturday, February 15, 2014

Butterfly Unit

To continue with the Butterfly lapbooks, here are some fun activities to do with your butterfly unit.

 Butterfly Symmetry game.
I take no credit for this except I made my own set.
I got this from All Our Days blog. 
She included a free printable that makes this so easy.
All you have to do is print, cut out felt pieces, and you have your own set.
She also has a toddler version of this if this is too hard for your little one.
 Water color caterpillar.
I took a plastic cup and dipped it in black paint to make the original circles.
I did this the day before and let it dry.
Then, the kids colored with water colors in each circle. 
This is a great opportunity to teach about primary colors and secondary colors.
 Life cycle of a butterfly. 
I just cut out a large circle and let the kids glue on the parts.
For the parts: I have white small beans as eggs.
I have Fusilli pasta for the caterpillar (I had to look that pasta name up.).
I used acorns for the Chrysalis (or cocoon).
I have farfalle pasta for the butterflies.
 I found wooden butterfly cut outs at the Dollar Store.
I hot glued a Popsicle stick on one side to make puppets.
We colored the butterflies with markers, but you could paint too.
We stuck these outside in the garden once they were done.
 Coffee Filter butterflies.
For further pictures and instructions go HERE.
You can color the filters with washable markers and
then get them a little wet to blur the colors. 
You could watercolor them or even paint them. 
Once colored and dried, take the wooden
clothespin and bunch the filter in the middle. 
Take the pipe cleaners and make antenna. 
You could attach goggly-eyes to the clothespins too.
I forgot to take pictures of the completed project.
Beaded pipe cleaner caterpillars.
I stuck a bead on the end and twisted the pipe cleaner around it.
Then I gave the kids each a box of beads to make a caterpillar.
This is a great way to practice patterns, colors, even shapes.
The beads stay on pretty well and this would be great for younger kids too.

Have fun with butterflies!
~Possum

Sight Word I-Spy Bags

I made these using felt, clear plastic material, large lima beans, and colored pasta.
Each one of these took a piece of felt which was
half (hamburger end) of an 8 1/2 by 11 inch piece of felt. 
I took a regular size piece of felt and cut it in half (8 1/2 by 5 1/2 inch)
and then folded it to make the bags. 

I cut out a rectangle piece on the front and sewed a piece of
clear plastic material (it is the material you use as a clear table cloth or shower curtain).
 Here is a close up of one bag.
I took large lima beans and wrote on them with permanent markers.
I then put colored pasta as extra stuffing.
I sewed a letter or number on the back (before you stuff or sew it together). 
This helps me remember what sight words are in each bag.
P = Preschool, K=Kindergarter, 1=1st grade, 2=2nd grade, 3=3rd grade.
I also made a laminated list that goes with each bag.
~Possum

Butterfly Lapbooks

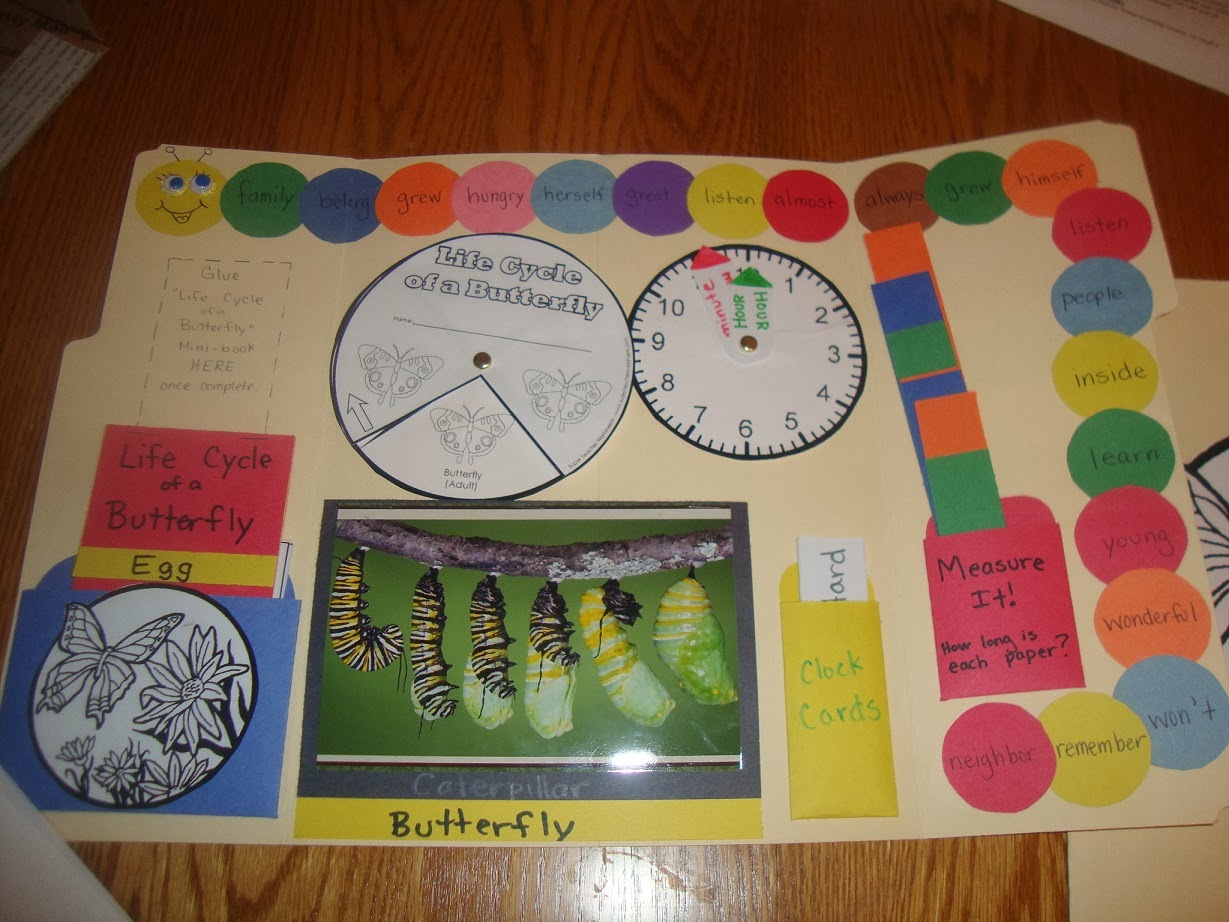
 I thought I would share the Butterfly lapbooks I made for my kids.
The one on the left is for first grade and the one on the right is preschool/kindergarten level.
Keep in mind that these are the duplicates I made for my sister's kids.
 This is the 1st/2nd grade level lapbook cover. There is a diagram of butterfly parts on the top.
The butterfly ballad (song) is in the green border. I got that from SuperTeacherWorksheets.
The red pocket contained pictures of butterflies for a game inside.
 This is inside the folder.
There is a life cycle of a butterfly circle that turns to reveal each stage in the cycle.
I found this on Super Teacher Worksheets too.
The strips of paper on the right are for practicing measuring.
Each strip is to the nearest inch or nearest centimeter. 
The life cycle of a butterfly flip book (red and yellow book on left) is for each stage in the life cycle.

The caterpillar has sight words and I made a set milk jug lid sight words to match.
This is a simple matching game of matching sight word to caterpillar.
And this is only a few sight words, not all of them.
See below for the lids and painted box I made to go with this.
Notice I made a set of numbers and capital letters to go with this too.
 Here is another view of the inside of the 1st/2nd grade folder.
The book I'm holding up in the picture is just pictures of the
progression of a caterpillar to a chrysalis and the coming out of a butterfly. 
I found those online by using a search engine (keyword: butterfly metamorphosis).
A great site is TheButterflySite.com.
Look up their life cycle page for these photos.

The cards on the left are what was in the blue pocket.
They are sequence cards of the stages of a butterfly.

The clock cards are on the bottom right and go with the clock face.
 I cut up a large index card into strips and put three different times on them.
I put three times that are easy, medium, and hard.
 This was a stand alone sheet that I laminated and stuck inside. 
This has room for math problems that can be used with a white board marker.
It can be erased and used many times.
 Here is the back side of the laminated sheet.
This is to be used the butterflies that are in the red pocket
on the front of the lapbook. The game is to pick several butterflies
and sort tally up how many have a certain color.
Then graph the results on the graph below.
 This is the inside of the Pre-K/K lapbook.
I made a caterpillar with lower case letters of the whole alphabet.
I made matching lids with capital letters to match for tactile work on letters.

I have a colors book on the left that is a flip book for the rainbow colors.
The book below is for the basic shapes and is also a flip book.

I made sequence cards, life cycle circle, and easy clock cards like the other folder.
The red pocket contains number practice cards. See below for more information.
These are the counting cards and I made a set of lids
that have the numbers 1-10 on them to go with these.
I used a butterfly stamp and different colors to make these.
I made a set of lids with each stage of the butterfly cycle for tactile arrangement too.

If you want to see the rest of the butterfly unit, check the label "Butterfly unit."
~Possum

Wednesday, October 30, 2013

Cheap Sensory Bin

I have discovered this thing called "sensory bins." For those of you who have not discovered it, I urge you to read further. They are wonderful! A sensory bin is a bin that has some kind of material inside it that allows for playing with the senses. Hence the name sense-ory bin. You can make a bin from any size bin and fill it with whatever your heart desires. I have given you a cheap example that will get you started. Usually a sensory bin is a bigger success if you theme it and try to stick to that theme. Notice my sensory box is Halloween colors and contents. You could do a pirate bin with fake coins, beaded necklaces, maybe a fake treasure chest, and teaspoons as shovels in blue gravel or sand.

Final Product
Resources:
Plastic bin of some size: I used a shoe size box from Walmart or Dollar Store. $1
Dried Beans for filling: 1 lb bag from Walmart $2 (I rounded this price)
Fun objects: I bought a bag of small Halloween objects at the Dollar Store $1
Spoon(s) for playing: I got these out of my kitchen, but you can buy a set of teaspoons at the Dollar Store $1

Grand Total: $5 for a fun afternoon activity that will keep your little ones occupied.

Dollar Store Halloween objects

My little ones playing with bins.


WARNING: Please be warned that this activity is messy and probably not a good choice for small children unsupervised as it is a choking hazard.

TIP: Notice in my picture that my kids have blankets underneath them. This is a requirement as it makes clean up so much easier. I set rules that they are only allowed to play with the bins if they stay on the blanket. When they are done, we simply pick up the blanket and dump the contents into the bin.

Other ideas for sensory bin contents:
Other dried beans such as Pinto, Lima, or Garbanzo
Rice
Corn kernels
Clear rocks (GemStones)
Uncooked pasta
Cooked pasta
Sunflower seeds
Sand
Ice water or just water
Cotton balls
Cheerios or Fruit Loops
Jello

Ideas for fun objects:
Shells
Small plastic animals
Pom Poms
Cars
Foam letters
Fake flowers
Any small party favors

The possibilities are endless.